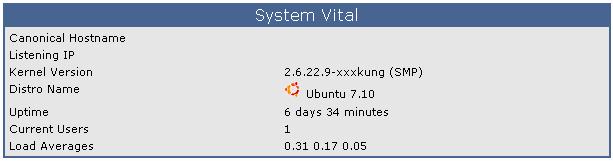
ข่าว: ข่าวประกาศ

  • 27 พฤษภาคม 2024, 02:13:02

เข้าสู่ระบบด้วยชื่อผู้ใช้ รหัสผ่าน และระยะเวลาในเซสชั่น

แสดงกระทู้

This section allows you to view all posts made by this member. Note that you can only see posts made in areas you currently have access to.


Topics - admin

หน้า: 1 ... 18 19 [20] 21 22 ... 24
293
(**ไม่สามารถแจ้งข้อมูลบางส่วนได้ เนื่องจากเป็นความลับของทางร้าน และเพื่อไม่ให้เกิดการเปรียบเทียบกันระหว่างแต่ละร้าน**)
หากต้องการทราบข้อมูลเพิ่มเติม ติดต่อผ่านทางฝ่ายขาย

ติดตั้งระบบ MultiWAN 5 เส้น

รายละเอียดของ OS


รายละเอียดของ Network


รายละเอียดของ Hareware Server


294
(**ไม่สามารถแจ้งข้อมูลบางส่วนได้ เนื่องจากเป็นความลับของทางร้าน และเพื่อไม่ให้เกิดการเปรียบเทียบกันระหว่างแต่ละร้าน**)
หากต้องการทราบข้อมูลเพิ่มเติม ติดต่อผ่านทางฝ่ายขาย

ติดตั้งระบบ MultiWAN 4 เส้น

รายละเอียดของ OS


รายละเอียดของ Network


รายละเอียดของ Hareware Server


296
ปัญหามันเกิดเนื่องจากว่า M/B ที่มี RAID 0,1,5 ที่ติดมากับ Board นั้น มันใช้ไม่ได้กับ Ubuntu

ก็เลยพยายามหาวิธี ที่จะรวม HDD ทั้งหมด ของ HDD SATA2  80G จำนวน 3 ลูก

ให้ Linux มองเห็นเป็น 240G ลูกเดียว จะได้ง่ายต่อการจัดการ (หรือเปล่าน้อ) อิอิ

ก็เลยใช้ความสามารถของ LVM (เข้ามาช่วย)


297
สำหรับลูกค้าที่ติดตั้ง NetCafe Server จากทาง Hadyai Internet

เนื่องจากได้มีการพัฒนา script สำหรับ NetCafe Server อย่างต่อเนื่อง

ในกรณีที่มีปัญหาเรื่อง Patch Game ต่าง ๆ โหลดแพทแล้ว Error โหลดแล้วไม่สามารถติดต่อ Server ได้

หรือไม่สามารถ ftp ไปที่อื่นได้  หรือ update โปรแกรมบางโปรแกรมไม่ได้

หรือมีการ Login เวปบางเวป แล้วมีการถาม password ซ้ำหลาย ๆครั้ง

เมื่อมีการแจ้งเข้ามา ทาง Hadyai Internet จะได้ทำการ Update Script ให้เพื่อแก้ไขปัญหาดังกล่าว

ขอบคุณครับ


298
ใกล้เวลาแล้วที่จะมีกฎหมายกำหนดให้มีการเก็บบันทึกการใช้งาน สำหรับผู้ที่ให้บริการอินเตอร์เน็ต และองค์กรต่าง ๆ

หลายคนก็ยังสงสัยว่า แล้วใน Logfile ของ Squid มันเป็น Unix Timestamp แล้วเราจะรู้ได้อย่างไรว่าใครเข้าเวปอะไรบ้าง
ในเวลานั้น ๆ

ผมก็เลยเอาสคิปไฟล์เล็ก ๆ มาฝาก 2 บรรทัด ก็สามารถจัดการเรื่องเหล่านี้ได้

file name : timeconvert.pl  (เป็นภาษา perl นะครับ)

#! /usr/bin/perl -p
s/^\d+\.\d+/localtime $&/e;


สองบรรทัดแค่นี้แหละครับ

ส่วนวิธีการใช้งานก็ไม่ยาก ใช้คำสั่ง  timeconvert.pl <logfile name>

root@myhost:/var/log/squid#./timeconvert.pl access.log

ก็จะได้การแปลงเวลาออกมา

โค๊ด: [Select]
Thu May 29 06:44:42 2008     11 192.168.182.172 TCP_MEM_HIT/200 519 GET http://www.zheza.com/images/blog/grp/blog_r1_c2.gif - NONE/- image/gif
Thu May 29 06:44:42 2008     26 192.168.182.172 TCP_MEM_HIT/200 457 GET http://www.zheza.com/images/blog/grp/blog_r1_c3.gif - NONE/- image/gif
Thu May 29 06:44:42 2008      3 192.168.182.172 TCP_MEM_HIT/200 519 GET http://www.zheza.com/images/blog/grp/blog_r1_c8.gif - NONE/- image/gif
Thu May 29 06:44:42 2008      4 192.168.182.172 TCP_MEM_HIT/200 615 GET http://www.zheza.com/images/blog/grp/blog_r4_c1.gif - NONE/- image/gif
Thu May 29 06:44:42 2008      3 192.168.182.172 TCP_MEM_HIT/200 472 GET http://www.zheza.com/images/blog/grp/1_r3_c2.gif - NONE/- image/gif
Thu May 29 06:44:42 2008      5 192.168.182.172 TCP_MEM_HIT/200 458 GET http://www.zheza.com/images/blog/grp/blog_r2_c8.gif - NONE/- image/gif
Thu May 29 06:44:42 2008      3 192.168.182.172 TCP_MEM_HIT/200 457 GET http://www.zheza.com/images/blog/grp/blog_r8_c3.gif - NONE/- image/gif

เป็นต้น

ถ้าต้องการให้แสดงผลออกมาเป็น file ก็ใช้คำสั่ง

root@myhost:/var/log/squid#./timeconvert.pl access.log > squid.logfile

ก็จะได้ไฟล์ที่แปลงเวลาเรียบร้อยแล้ว

ถ้าต้องการค้นหาเป็นวัน หรือบางช่วงเวลา ก็ใช้คำสั่ง grep เพื่อดักเฉพาะข้อมูลที่เราต้องการได้ เช่น

ต้องการทราบว่า วันที่ 29 พฤษภาคม 2551 ช่วงเวลา 8:20 ในร้านมีเครื่องไหนเข้าเวปอะไรบ้าง ก็ใช้คำสั่ง

root@myhost:/var/log/squid# ./timeconvert.pl access.log | grep 'May 29 08:20'

*** บางเครื่องอาจจะมี logfile หลายไฟล์ เนื่องจากการทำ rotate จะต้องค้นหาให้ตรงกับไฟล์และเวลาของข้อมูลในไฟล์ ***

โค๊ด: [Select]
Thu May 29 08:20:14 2008    118 192.168.182.137 TCP_MISS/200 841 GET http://www.kapook.com/images/bigbanner/test.php - DIRECT/203.150.224.174 text/html
Thu May 29 08:20:14 2008    139 192.168.182.137 TCP_MISS/200 1791 GET http://164.115.2.192/banner/adshow.php?zid=81 - DIRECT/164.115.2.192 text/html
Thu May 29 08:20:14 2008    201 192.168.182.137 TCP_MISS/200 371 GET http://164.115.2.192/banner/keeptrack.php?bid=112&zid=81&cid=75 - DIRECT/164.115.2.192 text/html
Thu May 29 08:20:32 2008    494 192.168.182.137 TCP_MISS/200 856 GET http://www.kapook.com/images/bigbanner/test.php - DIRECT/203.150.224.176 text/html
Thu May 29 08:20:32 2008    140 192.168.182.137 TCP_MISS/200 1793 GET http://164.115.2.192/banner/adshow.php?zid=81 - DIRECT/164.115.2.192 text/html
Thu May 29 08:20:32 2008    162 192.168.182.137 TCP_MISS/200 371 GET http://164.115.2.192/banner/keeptrack.php?bid=113&zid=81&cid=76 - DIRECT/164.115.2.192 text/html
Thu May 29 08:20:50 2008    374 192.168.182.137 TCP_MISS/200 841 GET http://www.kapook.com/images/bigbanner/test.php - DIRECT/203.150.224.174 text/html
Thu May 29 08:20:50 2008    139 192.168.182.137 TCP_MISS/200 1809 GET http://164.115.2.192/banner/adshow.php?zid=81 - DIRECT/164.115.2.192 text/html
Thu May 29 08:20:50 2008    187 192.168.182.137 TCP_MISS/200 371 GET http://164.115.2.192/banner/keeptrack.php?bid=105&zid=81&cid=70 - DIRECT/164.115.2.192 text/html

เราก็จะทราบได้ว่า เครื่อง IP หมายเลข 192.168.182.137 เข้าเวปที่แสดงผลออกมา

ถ้าเป็นร้านอินเตอร์เน็ตก็ควรจะตั้งค่า IP ประจำเครื่องไว้
แต่ถ้าเป็นหอพัก หรือองค์กรที่ใช้แบบ Dynamic IP ก็จำเป็นจะต้องเก็บ Logfile ของ IP ไว้ด้วย

299
Linux Server System / Traffic Shape with Ubuntu
« เมื่อ: 01 มิถุนายน 2008, 11:32:56 »
Ref : http://www.weijl.org/index.php?page=cbq-traffic-shaping

CBQ traffic shaping with Debian

Version 0.1, 2008-03-31

Traffic shaping (also known as "packet shaping") is an attempt to control computer network traffic in order to optimize or guarantee performance, lower latency, and/or increase usable bandwidth by delaying packets that meet a certain criteria. More specifically, traffic shaping is any action on a set of packets (often called a stream or a flow) which imposes additional delay on those packets such that they conform to some predetermined constraint (a contract or traffic profile). Traffic shaping provides a means to control the volume of traffic being sent into and/or from a network in a specified period (bandwidth throttling), or the maximum rate at which the traffic is sent (rate limiting). This control can be accomplished in many ways and for many reasons; however traffic shaping is always achieved by delaying packets.

What I was looking for is a way to 'cap' my connection, so it won't halt when someone is downloading something from (for example) my website. This can be done with traffic shaping, and a package called shaper is going to make this pretty easy. In this document I will discuss what you need in order to start 'capping' and give some examples to get you started.


Table of Contents
What do we need?
Example configurations files
Testing our shaped connection


--------------------------------------------------------------------------------


What do we need?
What we need is a package called shaper, which can be found in the debian repositories. Just apt-get it and we can go to work!
root@hostname# apt-get update
root@hostname# apt-get upgrade
root@hostname# apt-get install shaper


It is possible you do not have some packages it relies on (like iproute), but apt will take care of that for you just fine.


Example configuration files
Now shaper is installed we can create our configuration files for it and start capping that precious bandwidth. But before I start with the examples let's first look at the statements that I will be using. I had trouble to find the documentation, but a friend of mine pointed me to the init script itself.
# DEVICE=<ifname>,<bandwidth>[,<weight>] mandatory
# DEVICE=eth0,10Mbit,1Mbit
#
# <ifname> is the name of the interface you want to control traffic on, e.g. eth0
# <bandwidth> is the physical bandwidth of the device, e.g. for ethernet 10Mbit or 100Mbit,
# for arcnet 2Mbit
# <weight> is tuning parameter that should be proportional to <bandwidth>.
# As a rule of thumb: <weight> = <bandwidth> / 10
#
# When you have more classes on one interface, it is enough to specify <bandwidth>
# [and <weight>] only once, therefore in other files you only need to set DEVICE=<ifname>.
#
# RATE=<speed> mandatory
# RATE=5Mbit
#
# Bandwidth allocated to the class. Traffic going through the class is shaped to conform to
# specified rate. You can use Kbit, Mbit or bps, Kbps and Mbps as suffices. If you don't
# specify any unit, bits/sec are used. Also note that "bps" means "bytes per second", not bits.
#
# WEIGHT=<speed> mandatory
# WEIGHT=500Kbit
#
# Tuning parameter that should be proportional to RATE. As a rule of thumb,
# use WEIGHT ~= RATE / 10.
#
# PRIO=<1-8> optional, default 5
# PRIO=5
#
# Priority of class traffic. The higher the number, the lesser the priority.
# Priority of 5 is just fine.
#
# RULE=[[saddr[/prefix]][:port[/mask]],][daddr[/prefix]][:port[/mask]]
#
# These parameters make up "u32" filter rules that select traffic for each of the classes.
# You can use multiple RULE fields per config.
#
# The optional port mask should only be used by advanced users who
# understand how the u32 filter works.
#
# Some examples:
#
# RULE=10.1.1.0/24:80
# selects traffic going to port 80 in network 10.1.1.0
#
# RULE=10.2.2.5
# selects traffic going to any port on single host 10.2.2.5
#
# RULE=10.2.2.5:20/0xfffe
# selects traffic going to ports 20 and 21 on host 10.2.2.5
#
# RULE=:25,10.2.2.128/26:5000
# selects traffic going from anywhere on port 50 to
# port 5000 in network 10.2.2.128
#
# RULE=10.5.5.5:80,
# selects traffic going from port 80 of single host 10.5.5.5


I only grabbed the statements I am going to use in this document, but if you're curious what else shaper can do, look at the init file located at /etc/init.d/shaper.

Below is an outgoing SMTP example. You should be placed in /etc/shaper, and let's just name it cbq-0020-smtp.
DEVICE=eth0,100Mbit,10Mbit
RATE=512Kbit
WEIGHT=52Kbit
PRIO=4
RULE=,:25


Let's give another example but now on an incoming HTTP connection. For obvious reasons let's call this one cbq-0030-http.
DEVICE=eth0,100Mbit,10Mbit
RATE=512Kbit
WEIGHT=52Kbit
PRIO=4
RULE=:80,


Of course after you have made the configuration files, we need to restart shaper in order for it to work.
root@hostname# /etc/init.d/shaper restart


Both examples should cap the connection to a maximum of 512Kbit or 64Kbyte.


Testing our shaped connection
Just try and download something from your webserver now. Pretty neat huh?! I can imagine you do not want this behaviour for you localnetwork, so we have to create one more config file in order for it to work like we want it! Let us call it cbq-0010.http-localnetwork
DEVICE=eth0,100Mbit,10Mbit
RATE=100Mbit
WEIGHT=10Mbit
PRIO=4
RULE=:80,<network_range/subnet>


This can probably be done more efficiently, but since this worked for me I didn't look any further.


300
Linux Server System / Kernel-2.6.24 + iptables-1.4.0 + L7-filter-2.17 + ipp2p-0.8.2
« เมื่อ: 30 พฤษภาคม 2008, 18:14:05 »
Ref : http://suchart.wordpress.com/2008/02/02/kernel-2624-iptables-140-l7-filter-217-ipp2p-082-on-debian-40/

Kernel-2.6.24 + iptables-1.4.0 + L7-filter-2.17 + ipp2p-0.8.2 on Debian 4.0
Filed under: Debian, Linux, Ubuntu — suchart @ 2:20 pm
20080202-1400

Kernel-2.6.24 + iptables-1.4.0 + L7-filter-2.17 + ipp2p-0.8.2 on Debian 4.0

คราวนี้ ผมไม่ใช้ ipp2p-0.8.1_rc1 จาก patch-o-matic แล้ว จะใช้ ipp2p-0.8.2 จาก ipp2p.org แทน บวกกับ patch ที่แอบขโมยมาจาก gentoo

1.

apt-get update
apt-get install build-essential kernel-package libncurses5-dev fakeroot

2.

cd /usr/src/
wget http://www.kernel.org/pub/linux/kernel/v2.6/linux-2.6.24.tar.bz2
tar xvjf linux-2.6.24.tar.bz2
ln -s linux-2.6.24 linux

wget http://nchc.dl.sourceforge.net/sourceforge/l7-filter/netfilter-layer7-v2.17.tar.gz
wget http://jaist.dl.sourceforge.net/sourceforge/l7-filter/l7-protocols-2008-01-16.tar.gz

wget http://iptables.org/projects/iptables/files/iptables-1.4.0.tar.bz2

tar xvzf l7-protocols-2008-01-16.tar.gz
tar xvzf netfilter-layer7-v2.17.tar.gz
tar xvjf iptables-1.4.0.tar.bz2
ln -s iptables-1.4.0 iptables

3. patch linux kernel & iptables with l7-filter

cd /usr/src/linux
patch -p1 < ../netfilter-layer7-v2.17/kernel-2.6.22-2.6.24-layer7-2.17.patch
cd ../iptables
patch -p1 < ../netfilter-layer7-v2.17/iptables-1.4-for-kernel-2.6.20forward-layer7-2.17.patch
chmod +x extensions/.layer7-test

4. config and compile kernel

cd /usr/src/linux
cp /boot/config-2.6.18-5-686 ./.config
make menuconfig

เลือกไปที่

Networking –> Networking options –> Network packet filtering framework (Netfilter) –> Core netfilter configuration
เลือกเพิ่ม
<M> Netfilter connection tracking support
<M> “layer7″ match support
  • Layer 7 debugging output


ส่วนอันอื่นที่ยังไม่ได้เลือก ก็สามารถเลือกได้ ตามต้องการ สำหรับผม ในการติดตั้งครั้งนี้ จะเลือกทุกอันเลย โดยจะเลือกเป็นโมดูล [M] ไว้ก่อน
แล้ว exit ออกมา โดยกด Esc 2 ครั้งติดๆกัน แล้วไปที่ IP: Netfilter Configuration เลือกเพิ่ม

<M> IPv4 connection tracking support (required for NAT)
<M> Full NAT

อยู่ด้านล่างสุดเลย แล้ว exit ออกมา โดยกด Esc 2 ครั้ง ไปเรื่อยๆ จนกระทั่งปรากฏหน้าจอ

Do you wish to save your new kernel configuration?

ให้กด Enter เพื่อบันทึกค่าคอนฟิก

5. คอมไพล์และสร้าง kernel image ใหม่ ขั้นตอนนี้ต้องรอนานหน่อยนะครับ

make-kpkg clean
make-kpkg --initrd --append-to-version=-l7 kernel_image kernel_headers

6. หลังจากรอคอยมานาน ต่อไปก็ติดตั้ง kernel ใหม่

cd /usr/src
dpkg -i linux-image-2.6.24-l7_2.6.24-l7-10.00.Custom_i386.deb
dpkg -i linux-headers-2.6.24-l7_2.6.24-l7-10.00.Custom_i386.deb

ตรวจสอบไฟล์ /boot/grub/menu.lst ว่าค่า default เป็นเคอร์เนลที่ติดตั้งใหม่

shutdown -r now

8. คอมไพล์และติดตั้ง iptables

cd /usr/src/iptables
make KERNEL_DIR=/usr/src/linux
make install
mv /usr/src/l7-protocols-2008-01-16 /etc/l7-protocols

9. คอมไพล์และติดตั้ง ipp2p

cd /usr/src
wget http://ipp2p.org/downloads/ipp2p-0.8.2.tar.gz
wget http://sources.gentoo.org/viewcvs.py/*checkout*/gentoo-x86/net-firewall/ipp2p/files/ipp2p-0.8.2-kernel-2.6.22.patch
wget http://sources.gentoo.org/viewcvs.py/*checkout*/gentoo-x86/net-firewall/ipp2p/files/ipp2p-0.8.2-iptables-1.4.0.patch
tar xvzf ipp2p-0.8.2.tar.gz

cp -a ipp2p-0.8.2 ipp2p-0.8.2.orig
cd ipp2p-0.8.2
patch -p1 <../ipp2p-0.8.2-kernel-2.6.22.patch
patch -p1 <../ipp2p-0.8.2-iptables-1.4.0.patch

# ถ้าใช้ ld จะมีปัญหาในการโหลดโมดูล แก้ให้ใช้ gcc ที่บรรทัดท้ายๆของไฟล์ Makefile

vi Makefile

libipt_ipp2p.so: libipt_ipp2p.c ipt_ipp2p.h
$(CC) $(CFLAGS) $(IPTABLES_OPTION) $(IPTABLES_INCLUDE) -fPIC -c libipt_ipp2p.c
@# ld -shared -o libipt_ipp2p.so libipt_ipp2p.o
$(CC) -shared -o libipt_ipp2p.so libipt_ipp2p.o

clean:
-rm -f *.o *.so *.ko .*.cmd *.mod.c
endif

make
cp libipt_ipp2p.so /usr/local/lib/iptables/
cp ipt_ipp2p.ko /lib/modules/2.6.24-l7/kernel/net/netfilter/
depmod -a

11. Test

iptables -A FORWARD -m ipp2p --ipp2p -j DROP
iptables -A FORWARD -m layer7 --l7proto bittorrent -j DROP

mydebian:/usr/src/ipp2p-0.8.2# iptables -nvL
Chain INPUT (policy ACCEPT 1116 packets, 82622 bytes)
pkts bytes target prot opt in out source destination

Chain FORWARD (policy ACCEPT 0 packets, 0 bytes)
pkts bytes target prot opt in out source destination
0 0 DROP all — * * 0.0.0.0/0 0.0.0.0/0 ipp2p v0.8.2 –ipp2p
0 0 DROP all — * * 0.0.0.0/0 0.0.0.0/0 LAYER7 l7proto bittorrent

Chain OUTPUT (policy ACCEPT 664 packets, 91251 bytes)
pkts bytes target prot opt in out source destination

mydebian:/usr/src/ipp2p-0.8.2# lsmod | egrep 'ipp2p|layer7'
xt_layer7 11236 1
nf_conntrack 62720 2 nf_conntrack_ipv4,xt_layer7
ipt_ipp2p 6848 1
x_tables 14372 3 xt_layer7,ipt_ipp2p,ip_tables


หน้า: 1 ... 18 19 [20] 21 22 ... 24